Wednesday, October 31, 2012

Neck heel

Its amazing what a determined person and sixty grit sandpaper can get done in between trick or treaters.


Here is the "before" shot, for comparison:


The punch list

Man this working for a living thing really cuts into the time I have to do things I WANT to do...

Using some of the pictures I took and a little deductive reasoning, I think I've located the wiring channel, we'll see once I get those pickup cavities cut. After doing the sanding and control cavity, this bass is very lightweight, I wonder how much the hardware adds back in. I'd love to have a lighter instrument, my other fretless is very heavy.

While I haven't been able to actually work on the bass, I've had some time to look at it and put together a punch list of remaining items:

1) Pickup cavities 1.75x4.25 template, .75 deep
2) Body contour on the back (started, need to clean up)
3) Truss rod cover - use spalted maple with "natural" top break off
4) Back of neck, near the bottom needs a lot of attention/rounding/clean up
5) Upper horn needs some rounding help (damn foam sanding blocks do not play well with spalted!)
6) Drill for knobs
7) Final sand on the entire body and neck
8) Wood to fill in fret slots (dark or light? ARGH!)
9) Apply finish
10) Copper foil
11) Install electronics and connect wires
12) Mount hardware (bridge, strap buttons, machine heads)

Wow after writing that out, I can see there's a long way to go. I'm sure I missed a few things along the way. I project completion in 2-3 weeks depending on how much time I can get to spend on it.

Sunday, October 28, 2012

Control Cavity

I did the control cavity tonight. I did a single pass with the router:


Then I put a forstner bit in the drill press and hawged (is that a word?) out the rest of the cavity, leaving a lip where the cover will sit, then used a chisel to carve out the rest. I may need to take out a bit more material - I'll have to see after I get the preamp and knobs in. The pathway to the pickup cavity is right where it should be. If you look closely you can see black and a little white in the guide holes, that's the anigre and the white is the spalted maple, those knobs don't have many threads on them - I'll bet I'll need to take out more to get them in:


I know it looks kind of rough (because it is) but it will be covered in copper foil and its INSIDE the bass, no one will ever see it.

I cut another piece of black walnut (from an earlier bass) and used that to make the cover. For some reason I thought this was going to be a quick operation. Not so. It took forever to get that cover to fit. I am a bit disappointed that its not perfect, but I have to remind myself this is a hand, not machine, built instrument.


After I got it to the right size I used an orbital sander to make it the right thickness, so its flush.

Pickup cavities are next - maybe tomorrow night if my parents don't lose power.

Rough shaping

I spent a few hours over at the shop today. I did a lot of sanding, its really starting to look good.

I made a pretty big mistake though - I drew out the placement of the pickups on the body yesterday and I made the channels for the wiring based on where I drew the pickups. Unfortunately the first thing I did today was sand the front - sanding off the lines. Ugh. Hopefully I figure out where they were based on one of my pictures, and they don't have to be perfect to catch the channels. Oh well, keep your fingers crossed for me.

So I had to sand down the back to make it flush - the black walnut was about 1/8" thicker than the neck blank was. That was painful. I really should have put them through the sanding planer to get rid of some of that difference. It took a long time with a belt sander, which takes material way too fast for my liking.

I also used the belt sander to form the back of the neck.

I used the oscillating drum sander to sand down the spot where the wings hit the neck - this has been a problem point on the other instruments I made, I used a completely different approach this time around - not because its better, but because it was the only way I could do it with this neck blank. It looks great. Its hard to believe that every joint is tight, not sure how I did that or if I could repeat it. I wish I could say that it was skill, it seems like luck.

On to the pictures.

Whole instrument:

Neck heel - needs more work, but see that joint between the neck and the lower wing - tight, you can't see glue or space, NICE!:


Headstock

Upper wing (note how good the joint between the two woods looks - I added a little sawdust and glue:

The lower wing:

Saturday, October 27, 2012

Out of the clamps

I rescued the bass from the clamps. It looks great, but there is so much work to do, from every angle I can see something that needs sanding or forming.

I see four or five hours of sanding work to get it into shape, I'll mark it up with pencil lines tonight and hopefully get over there tomorrow to start working on it.


Short time, but big (sorta) results

I didn't have a lot of time to work on the bass today, but I stole a few hours and got some stuff done. First thing I did this morning was mark where the pickups and bridge will be located, then I checked and rechecked the placement of the machine heads. I was considering moving them so they are staggered rather than straight across from each other, but it was too late for that decision - the shape of the head stock wouldn't allow for a staggered configuration. One less decision to make!

The first thing I did at the shop today was straighten out the headstock a bit - I had used a foam sanding block for "final" sanding last time I was at the shop and it really made a mess rounding off the corners. A few minutes on the orbital drum sander and I had it back in shape. I also found that the headstock was too thick, a few minutes on the belt sander took care of that problem.

Next was drilling the holes for the machine heads - I drilled a pilot hole first then drilled from the front and from the back, amazingly they lined up perfectly. Looks good:

Next I made a channel for the wiring and drilled a hole to get from the pickup cavity to the control cavity - yay I remembered!

Then the step I love - rounding over the edges with a router - this really makes the bass look a lot less blocky. This was the first time I've really used a router unsupervised, it worked out great, but a little burning, its important to keep the router moving. I sanded one of the burn marks out, just to see how hard it was going to be - no big deal:

I always think the bass looks like a patient undergoing some kind of operation in a deranged hospital when its in the clamps - I know weird thought. Initially I was going to hang out over at my parent's house to wait for it to dry, but my father suggested that I give it time, sage advice.

This is a test fit, I actually took this picture for reference, I looked at it after I got the pieces all glued up to help me get the clamps in the right place.


After I got the glue on I moved the clamps around to get the glue to squirt out of the joints. It was a bit frustrating, but not as bad as I thought it was going to be - glad I did the test fit first. 

The next step will be to finish off the shaping on the body, I got what I could with the router, but there's areas that will take manual intervention. While today's progress is exciting, there's a LOT left to do. This manual shaping takes a lot of time, its slow and careful work. 


Sunday, October 21, 2012

BSO

I had limited time today (I might get a bit more time tonight), but I got the major cuts done so its starting to look a bit more like a BSO (Bass Shaped Object) than a block of wood. The steps start to get exciting from here on it. Unfortunately its back to work on Monday, so I'm not going to have much time to put in.

So how do you take a block of wood and make it look like a bass? Cut off all the pieces that don't look like a bass:

After doing those cuts with the band saw I used a oscillating drum sander to fine tune the shape and take all the saw tooth marks out. The inlays look great, a few very small gaps I'll deal with (sawdust and glue should easily do the trick):


Apparently flipping in Photobucket only flips it there, not when you link to it, sorry.

Saturday, October 20, 2012

First mock up

If I know myself (and I think I do) this is the first of many times I will do this - lay the stuff on top to see what it looks like - I made some changes to the outline, they are in pencil so you can't see them in this pictures.

It looks pretty good, but it will look a lot better once I get it cut, the extra wood hanging off the side is just so distracting. I need to line up a lot of stuff - where the control cavity, knobs, bridge and pickups will go. Also based on how everything glued up I'll need to tweak the design a bit. A few things didn't end up where they were supposed to. Not a big deal - just changing an arc here and there.


I have to get the headstock cut and drilled before I glue the wings up too. That's a lot of commitment :-D

Unclamped

I unclamped everything. It all looks good, but I won't know for sure until tomorrow when I can get to cutting and sanding. I have to wait for the glue to set 24 hours before I can do anything serious. I would take pictures, but they look a lot like the last pictures, just more permanent :-D

Glue up

I spent a few minutes getting the inlays a bit better aligned then I glued up all the inlays. I wish the inlays were absolutely perfect, they are very close. I just have no idea how close is close enough. I guess I'll find out once I start sanding.


I also got the nut lined up perfectly and glued on the headstock laminates. That was done a bit blind as I had to use a piece of plywood on top of it.


So I guess next I'll be cutting things down to size and using a roundover bit in the router to get to all the spots I can't hit once the wings are glued up.

Remember to cut that channel for wires! I put one set of wires in the bag I've been bringing over there, hopefully that will remind me.


Anigre

I really don't know much about this stuff, but I'm putting an anigre laminate underneath the inlays. You won't be able to see it from the front, but it gives the side view some interest. The black line makes the lines on the spalt pop too. Hopefully I'll get this all glued up today.
I need to stack wood and my mountain bike has been getting jealous of all the time I've been spending with the bass project. Seems like a ride is in order for this afternoon!

Friday, October 19, 2012

Inlays!

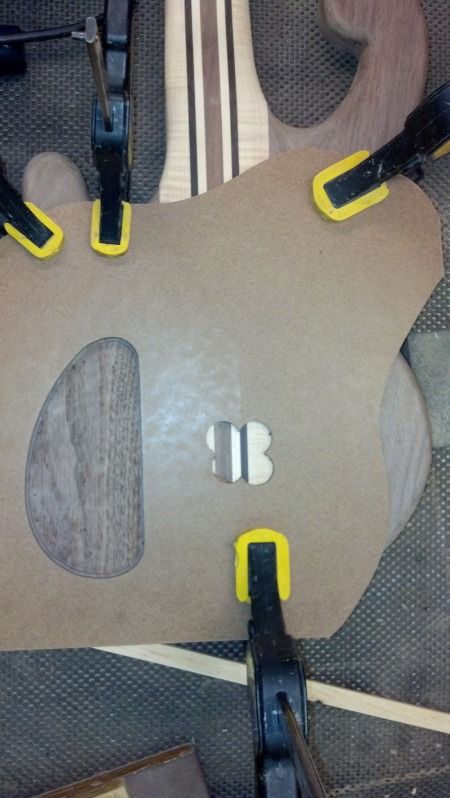
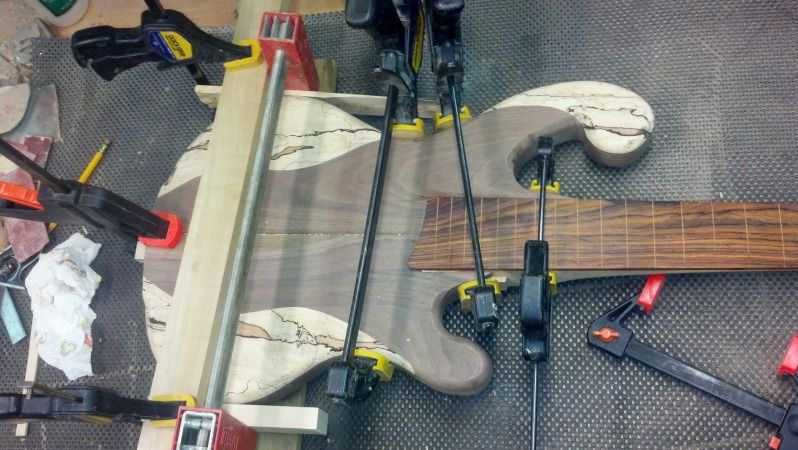
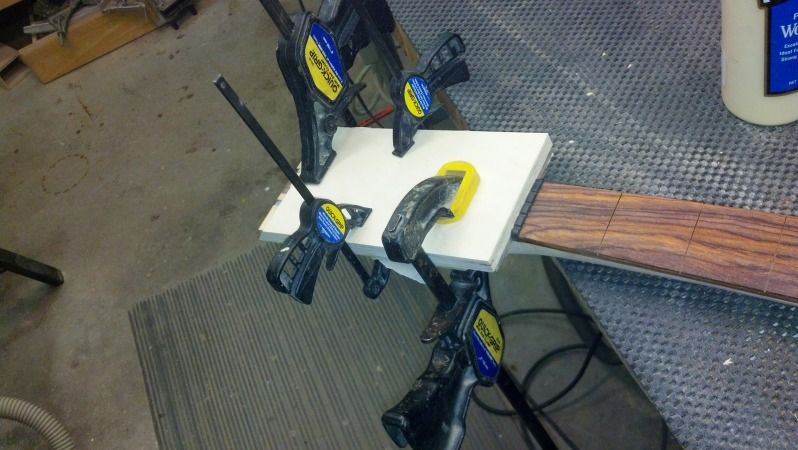
It was a tough, but productive day at the shop today. After a few false starts with router and clamping issues we got the pockets for the inlays routed out. If I haven't mentioned it before, my father has been helping me out with the tough steps. I'm a router novice so he ran the show today - or at least the parts involving the router.

I'll admit to being a intimidated at times working in my dad's shop, but I've done almost everything on my own this time around, but I do consult him when I'm not sure what to do. He's saved me from my ignorance many times on the four instruments I've built. Having access to all those high end tools is pretty amazing. Being able to share the time with my father is priceless.

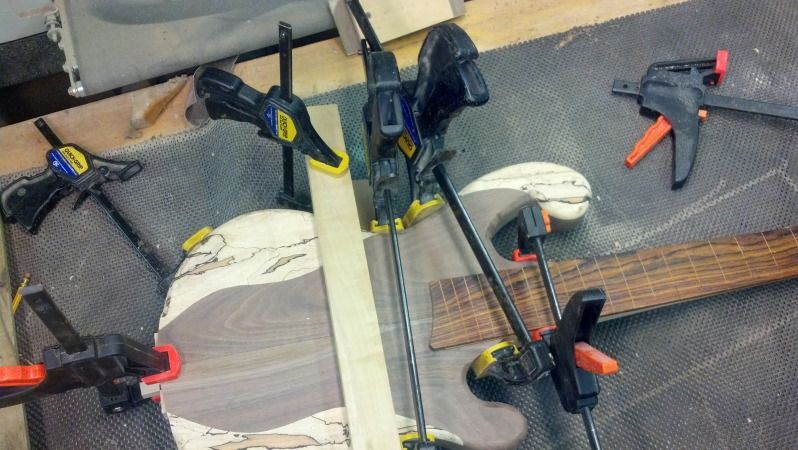
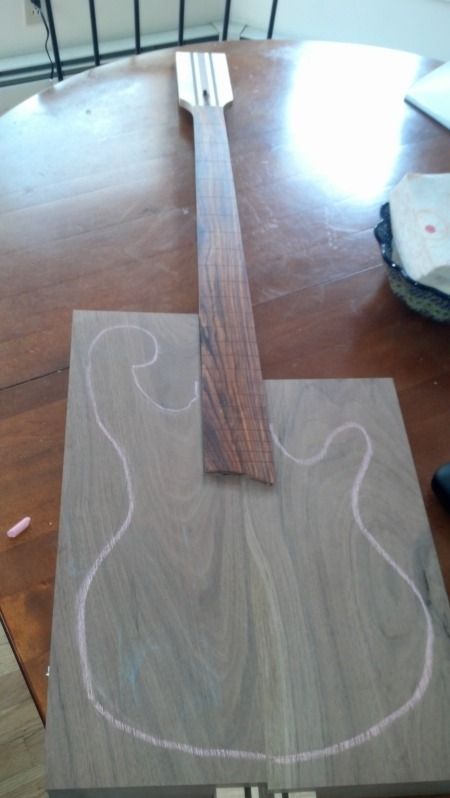
So today we made some templates for the inlays then we clamped them onto the wings and routed out the area. We had to take two passes and we had to move the template for each pass, so it was a pretty time intensive process. I suggested a few shortcuts which my dad labeled as "risky" (we didn't do them).
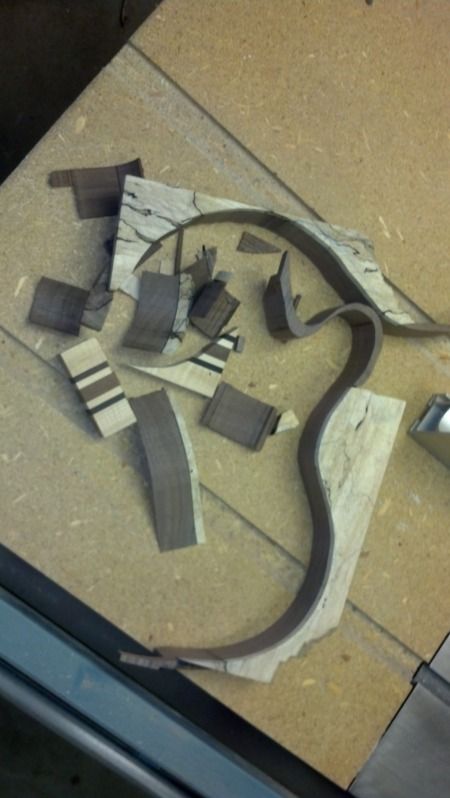
On to the pictures:

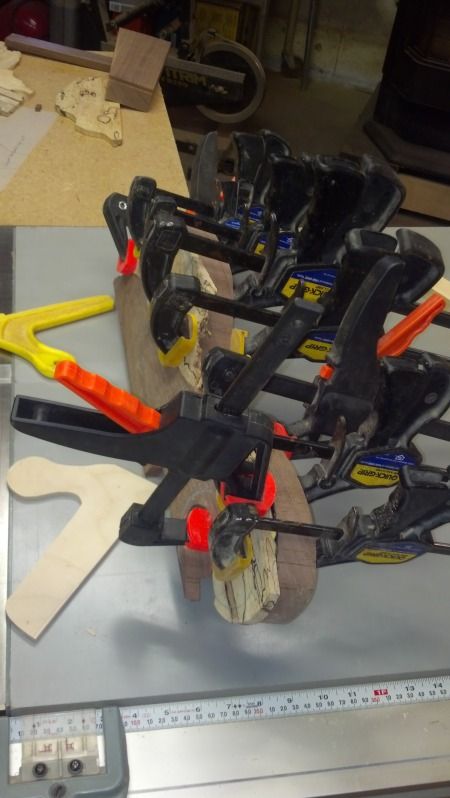
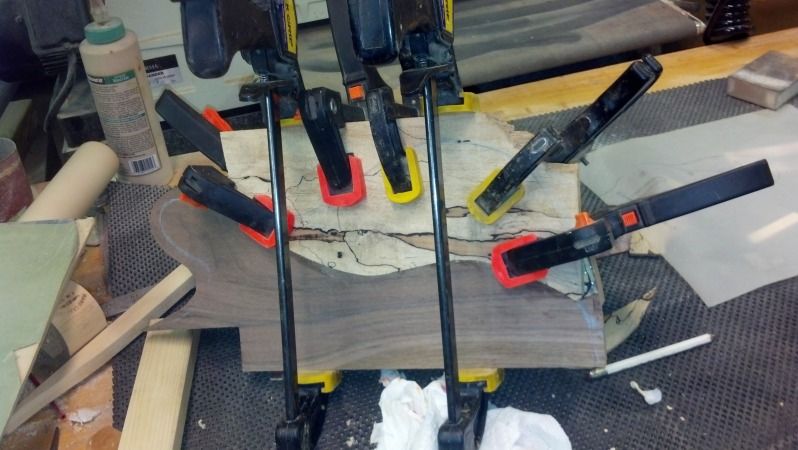
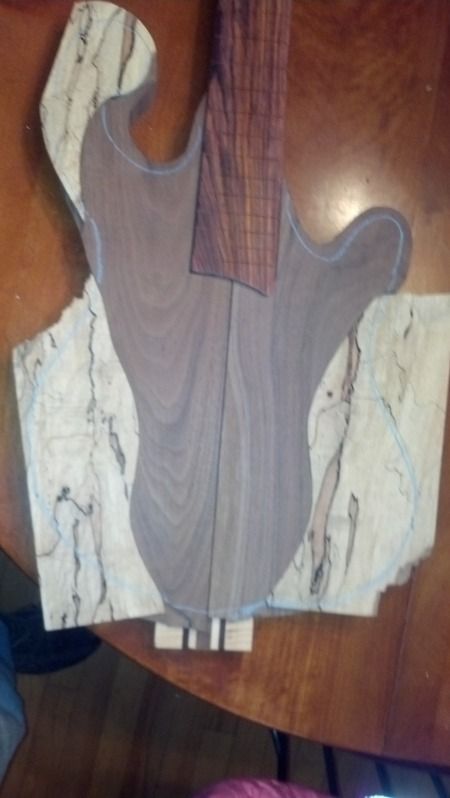
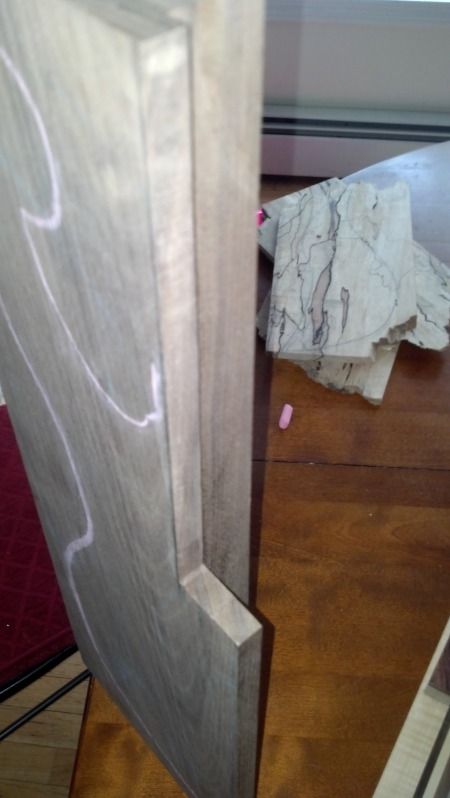
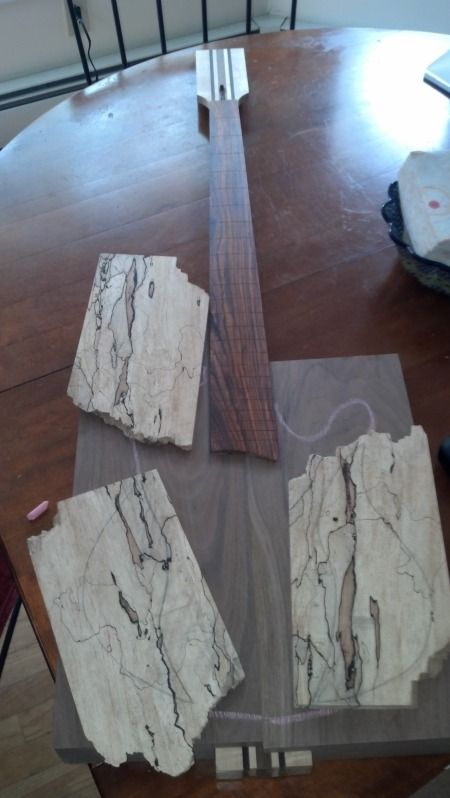
If I had any guts at all, I would have cut the wings to size before this step, I don't so I cut it really big. I'll cut it perfect after I get the spalted maple glued on. I figure if I messed up some measurement somewhere along the way I can still recover. It happened today - that upper horn is right at the edge of "wide" cut, if I cut it where it was marked I would be changing the design.

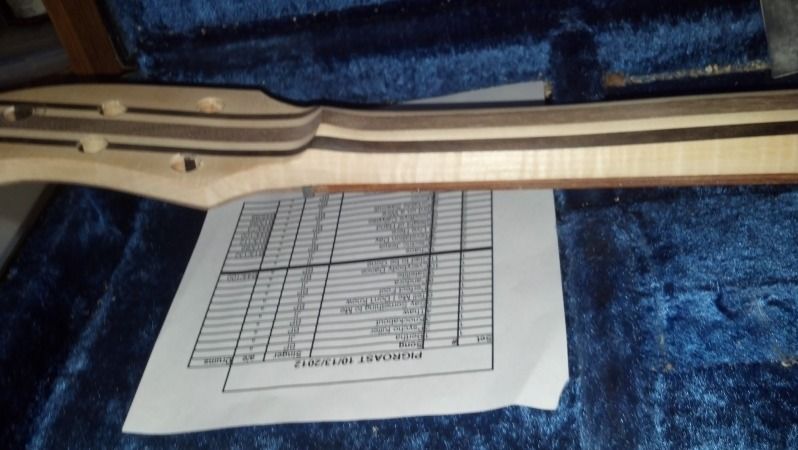
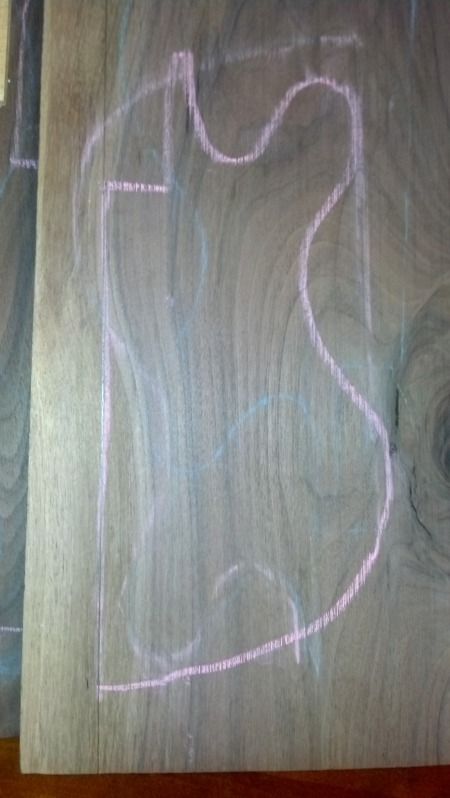
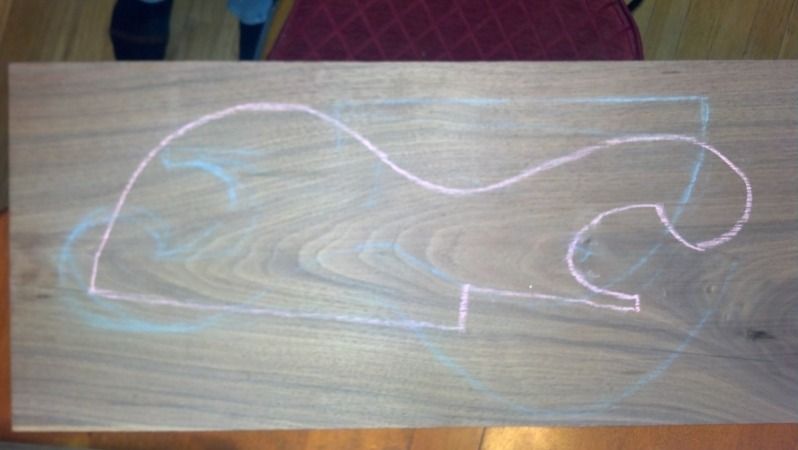
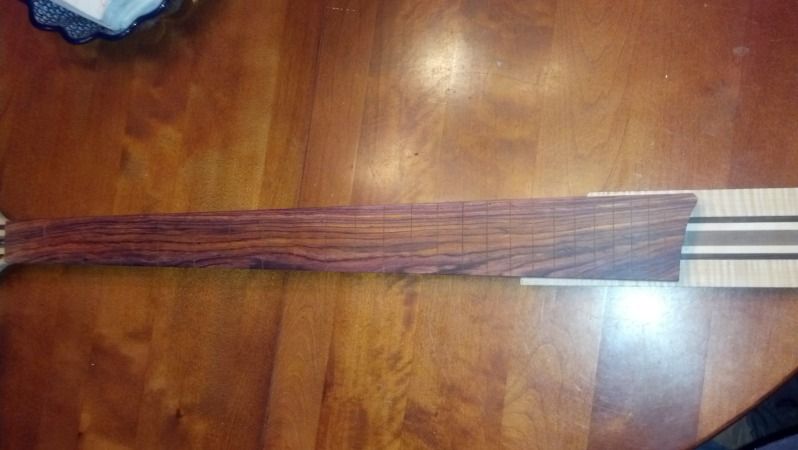
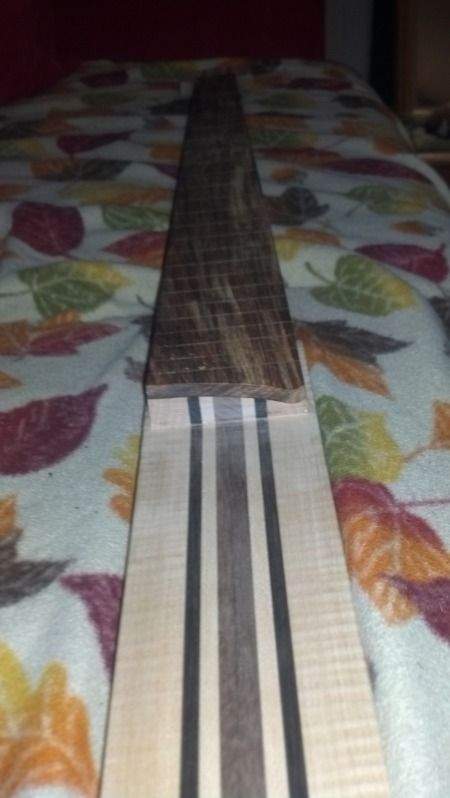
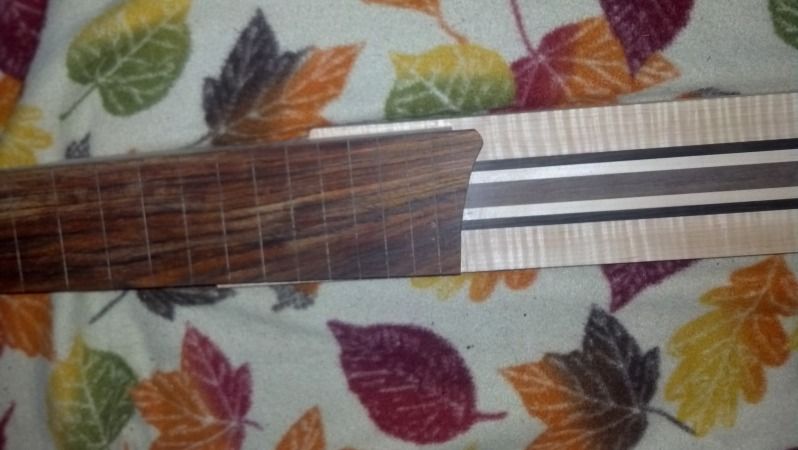
You'll have to settle for blue chalk lines for now.


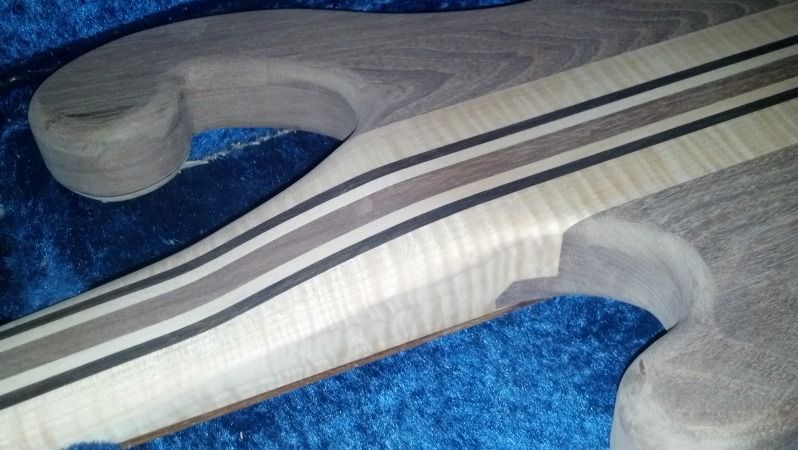
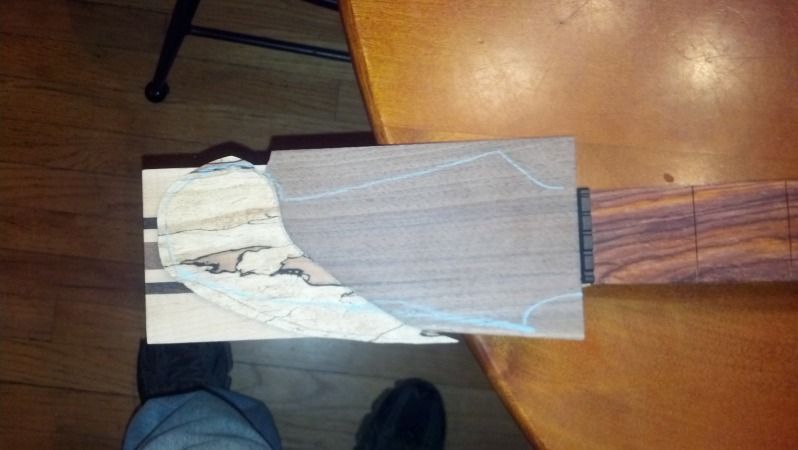
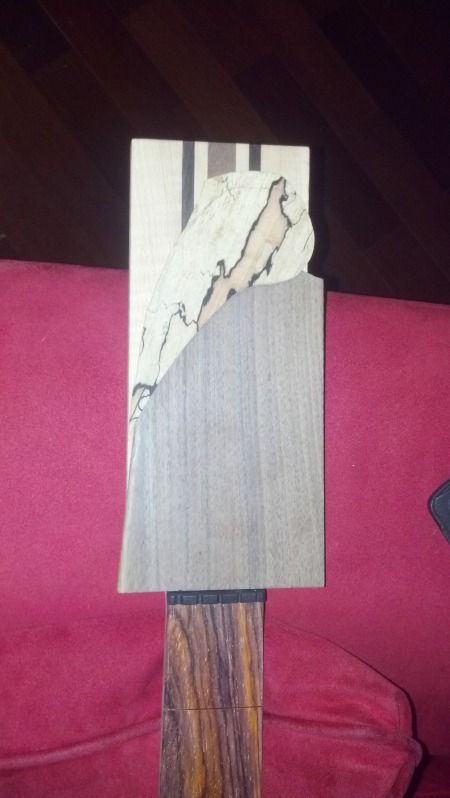
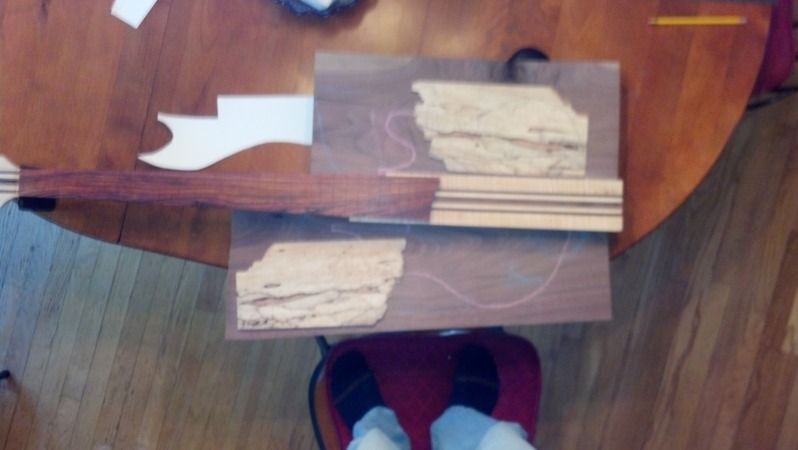
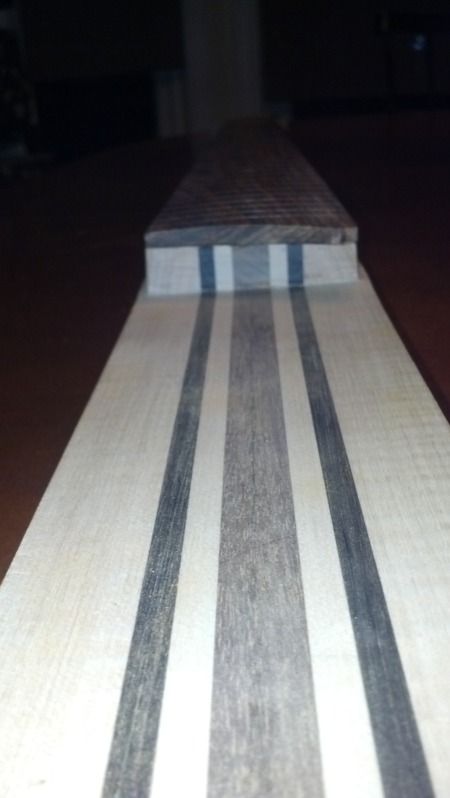
I spent over an hour getting the overlay for the headstock perfectly jointed last night, then when I looked at all the pieces this morning, I didn't like the orientation of the grain, so I cut a new one today. The weird thing is it took me 20 minutes tops to cut the new one and get it shaped, I thought I was getting good at it:

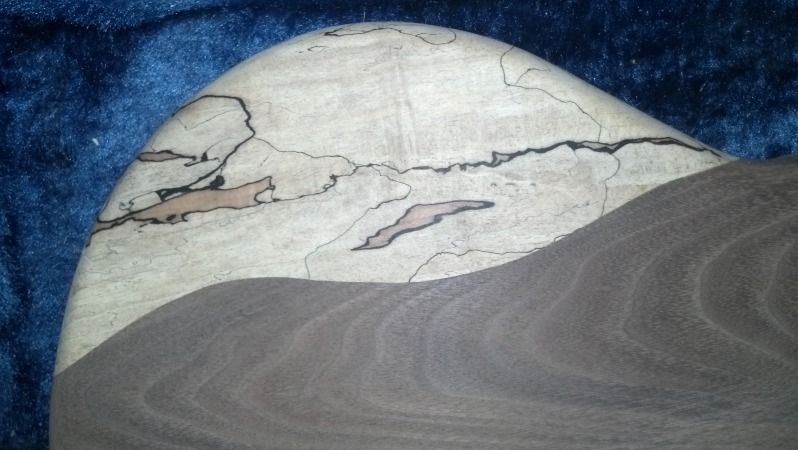
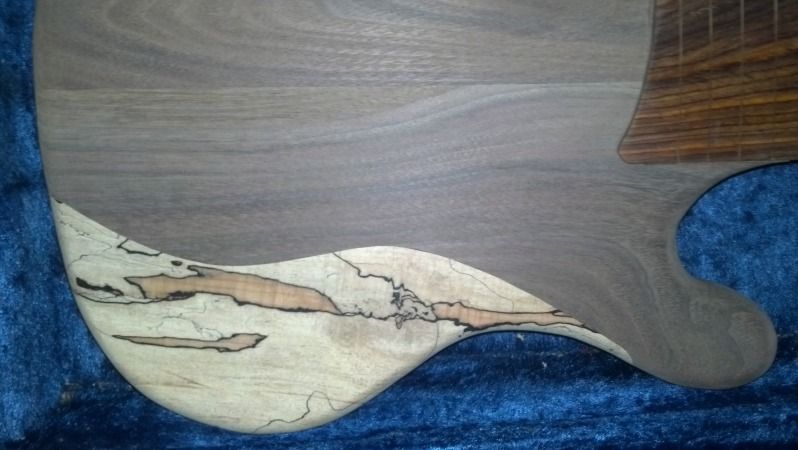
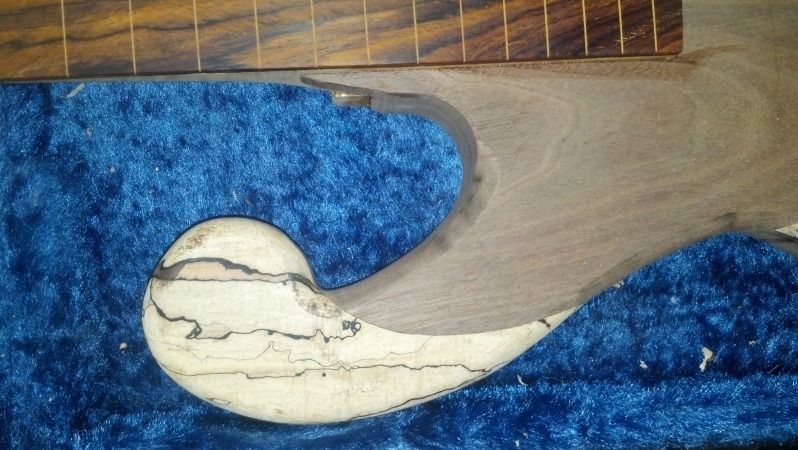
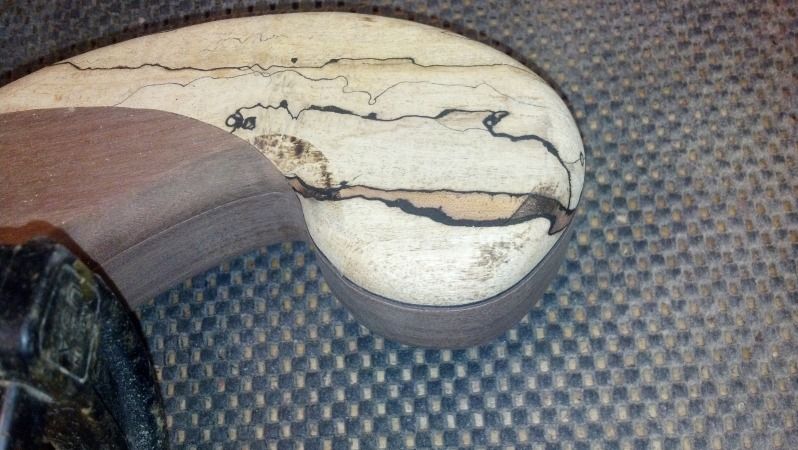
I said I thought I was getting good at it, that was before I started working on matching the inlays to the routed out bit. That took a long time. I probably have an hour into each inlay - they are not perfect yet, but actually pretty close. I can probably make them perfect in another hour total. 

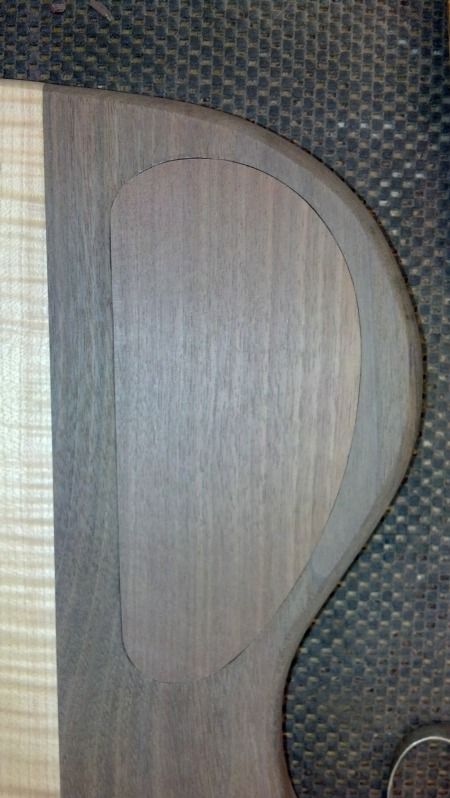
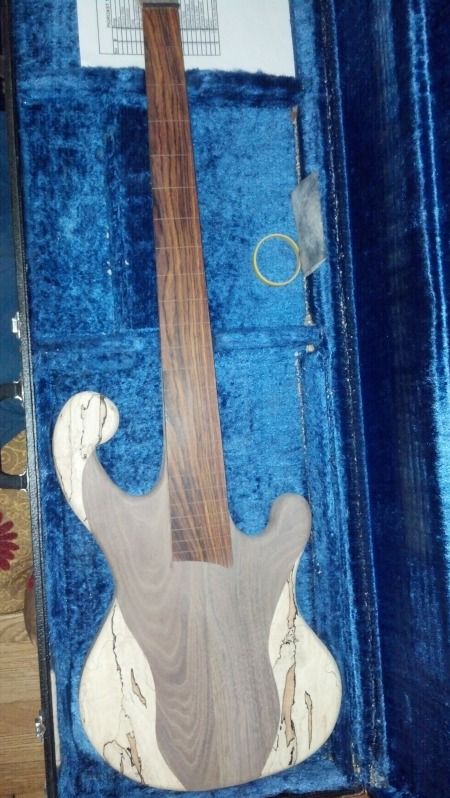
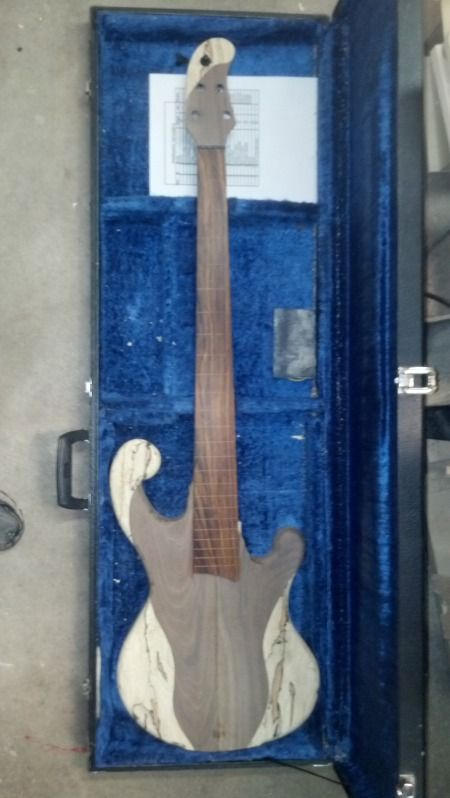
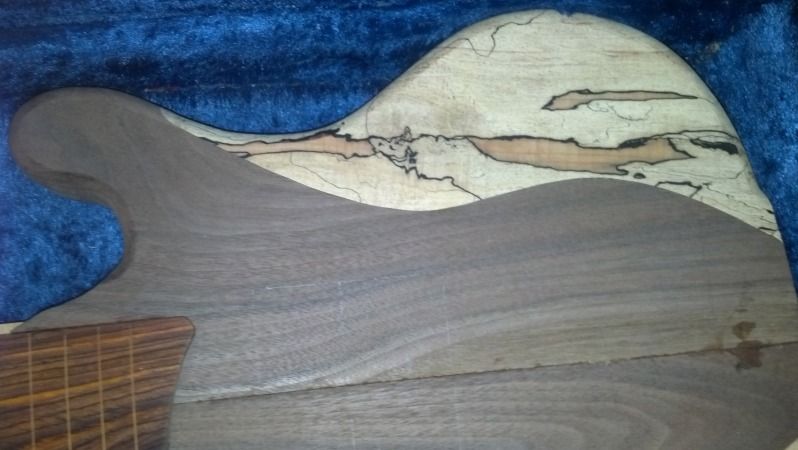
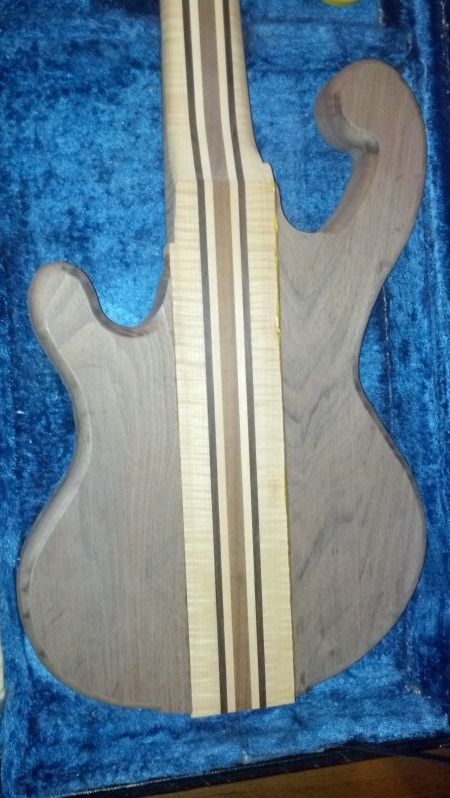
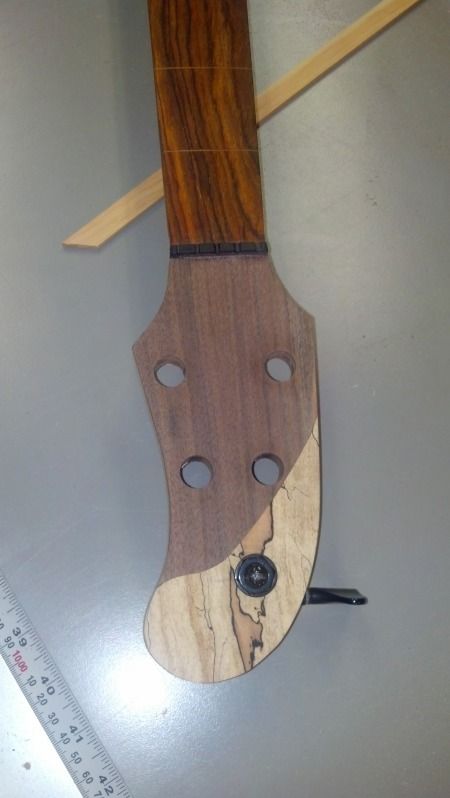
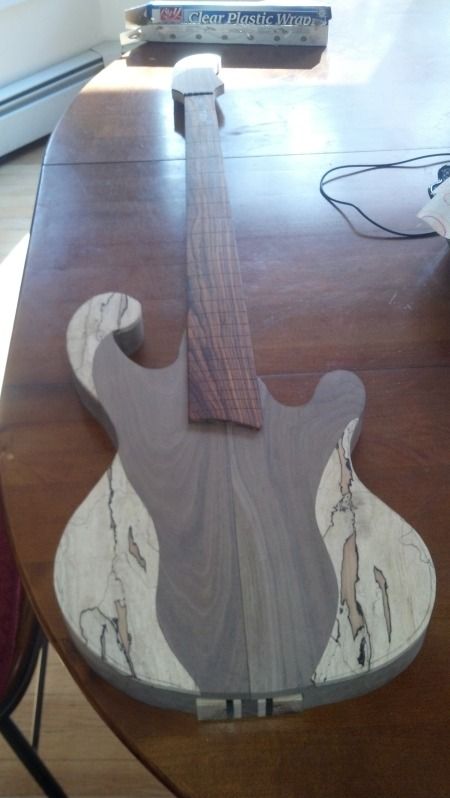
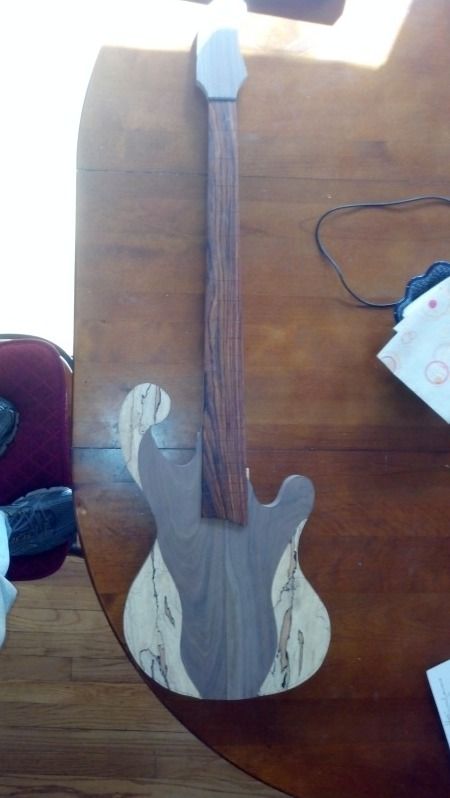
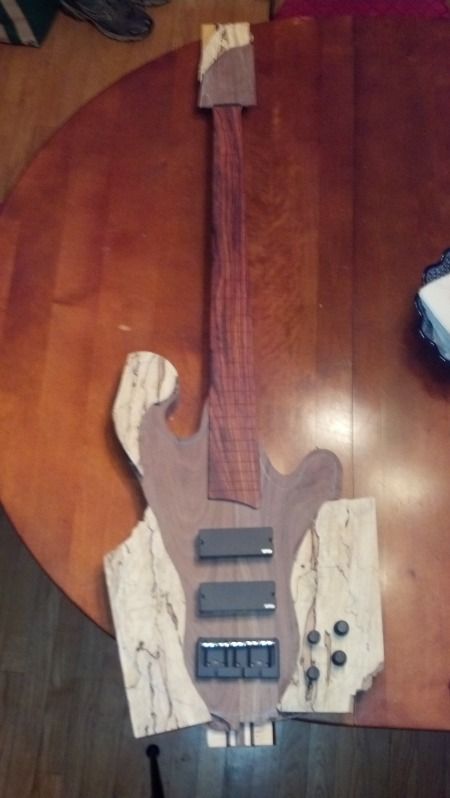
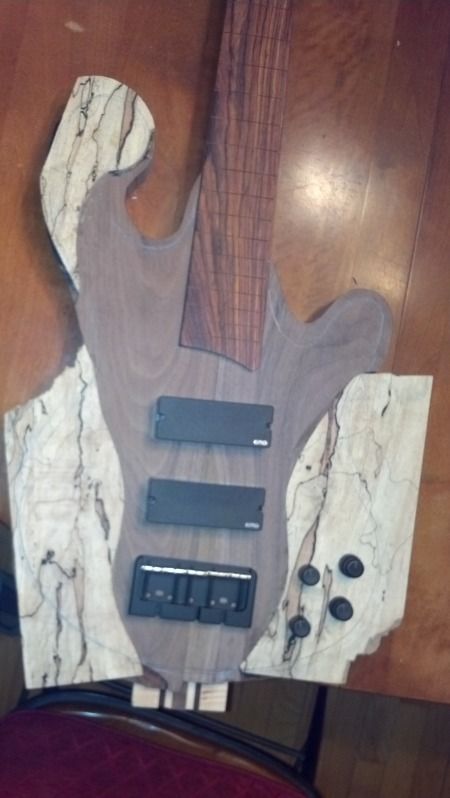
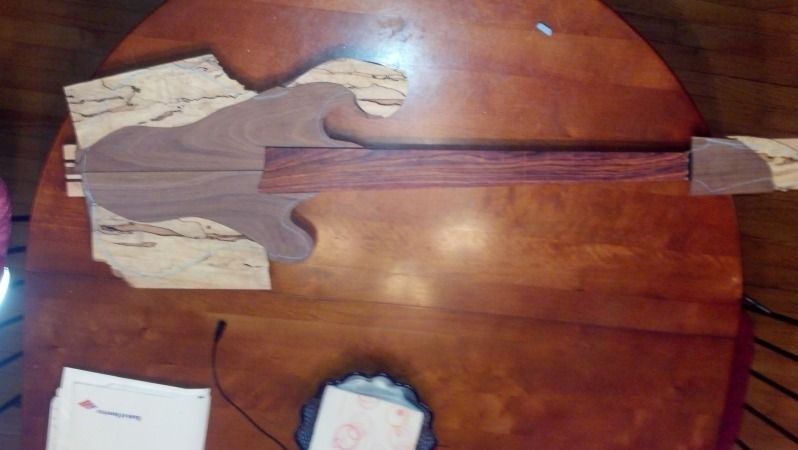
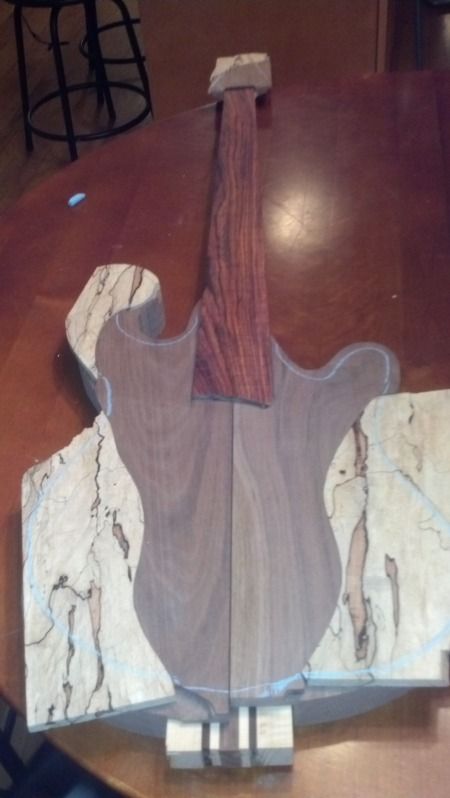
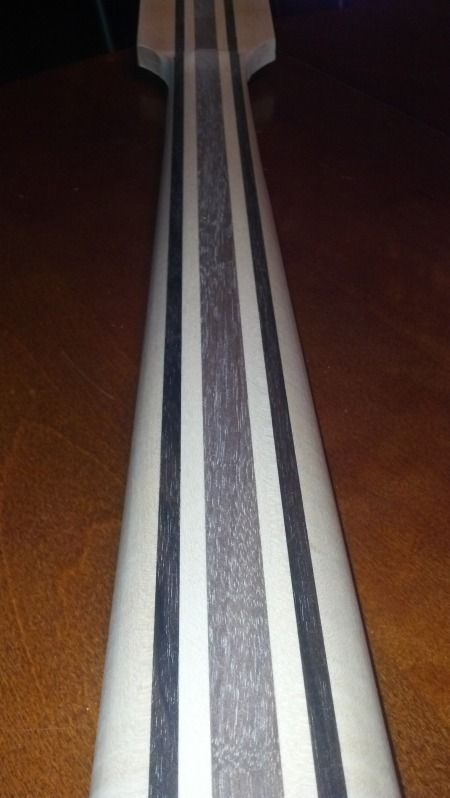
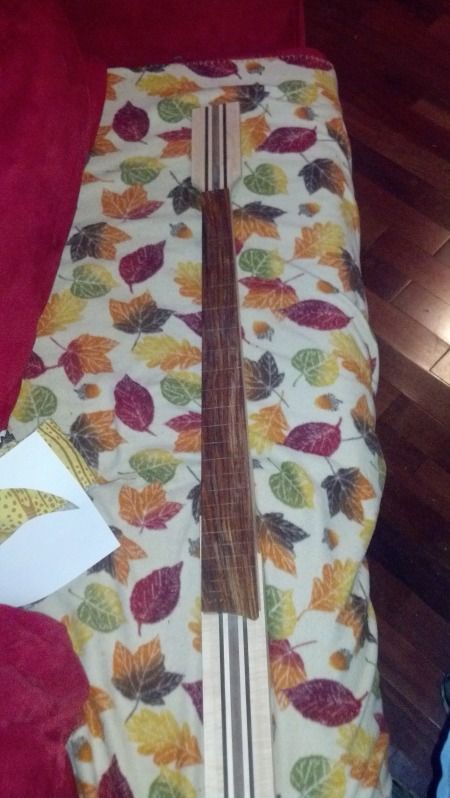
A couple of full body shots: 


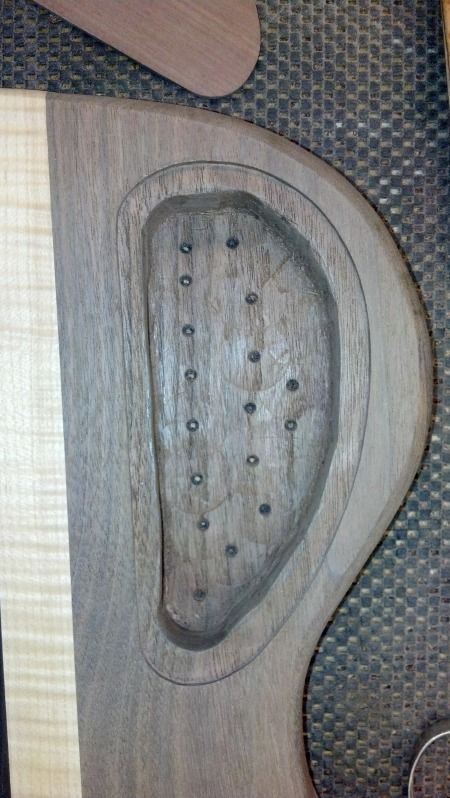
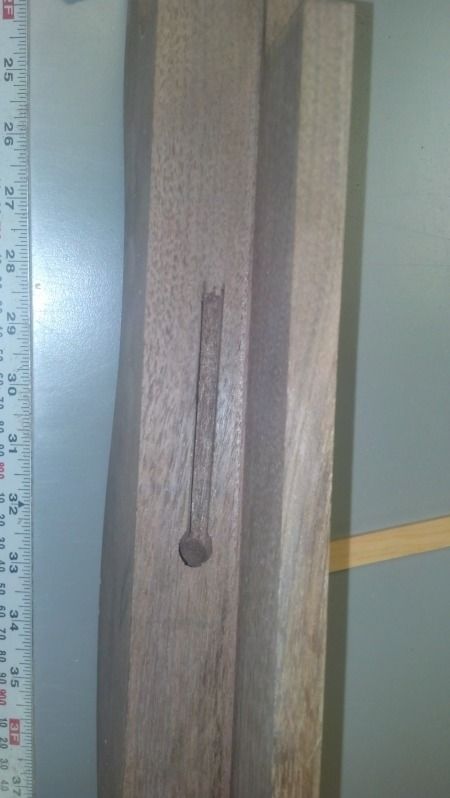
Right now the inlays are perfectly flush with the walnut, but I'll be putting some anigre underneath it (its an extremely thin, black dyed wood), which will bring it up a bit. After I get it all glued together I'll use a belt sander to bring it back down flush. Someone remind me to route a wiring channel in the lower wing, I am convinced I'm going to forget. That would make wiring the front pickup extremely difficult. 

Good progress, but almost five hours in the shop today. I'm probably still a few steps from getting to a bass shaped object, but I can see it happening soon! 


Thursday, October 18, 2012

Headstock inlay

This probably doesn't look like as much work as it was, it took a LONG time to get these two pieces to meet perfectly. I hope it works out as good as I think it will - this should bring elements from the body up onto the headstock. It looks really weird in this picture. I guess you'll have to trust me :-D


Tomorrow I will be doing the body inlays. I can't wait!

Wednesday, October 17, 2012

Wings

I worked on the wings a bit today - it was more careful work, these cuts were the ones that I have been thinking about - the cuts on both wings have to be perfect so that they both meet at the middle and hit the sides of the neck. Add to that the fact that on the sides up by the fretboard there's cut that's tapered. Putting all those things together was quite a chore, its not perfect yet, but 95% there - I'll have to do a little staring to figure out what exactly needs to be fixed. I stared at this a long time, measured eighteen times and still had a few issues :-D. In the end, it worked out fine. I can't wait to get this thing done. There's still a LOT of work to do, but I feel good getting done what I did.

A side view of the cuts on the upper wing, I had to do the same on the bottom wing:


With the wings over the neck - I like the way the two sides match where they meet - there's some difference in coloring, but the grain is pretty close:
and with the "to-be-inlayed" pieces in place.

That's the next step - I need to route for the inlays. I will probably get to that on Friday.

Deconstructionist view

I've spent way too much time staring at this walnut trying to figure out how to cut it for maximum effect. I want some interesting grain in places you will see it and more or less straight grain where the two sides meet. I've found the perfect alignment six or seven times (evidenced by the many chalk lines in the pictures). Now that I have final design for the spalted maple inlays I made some templates that allow me to see exactly what will be visible.

Here is what I decided upon (the pink lines):

Lower wing:


Upper wing:

So here's a "deconstructionist view" of the bass - it takes a little imagination to get the idea of what this will look like - and I left one of my inlay pieces is over at the wood shop (I hope):

The one inaccuracy in the above is that the walnut will go over the neck blank, so from the front you won't be able to see the stripes, it will just be solid walnut.

I guess I'll start working on those wings, but I also have to drill and cut the headstock before I get wings attached. I am somewhat undecided still about the headstock design - I'm thinking of doing another inlay over the very end of the headstock. I have to think about that and look at the wood I have. I think the inlay would have to be symmetrical, which would be a bit difficult. I may just leave it with the stripes exposed - I am really trying to do the right thing and not the easy thing on this build. Leaving it as it would be easy thing for sure.

I gotta stack firewood this morning, but maybe I'll get an hour or two over at the shop later on.

Tuesday, October 16, 2012

More Neck

I got another hour or so over at the shop. I hate to say this (mostly because I know its not true), but the neck is done! I'm sure I'll have some tweaking to do, but I like the way it feels right now. Its not as flat across the back as my two other Carvin-necked basses, but I like it! Frankly I'm a little afraid to go too much further down as I know that truss rod is lurking pretty close to the surface. I'll do some measurements tonight, just to know where I'm at. I did some of the work with the spoke shave, a bit with the belt sander (that thing cuts FAST) and then finished it off with the orbital sander. As far as I can tell its straight.

The cocobola is red when you sand it, but it oxidizes pretty quickly, going back to a brownish color - even now its not as red as it looks in this picture:

I tried to take a shot that showed the radius of the fretboard, I guess you can kind of see it. This took a stupid amount of hand sanding to get it done - no way around it. I had a sanding block that had the contour in it and I just double stick taped some sand paper on it.


The back looks great - apparently the maple gets dirty, right after you sand it, it looks so white and clean.


I have a bass that has a five piece neck, this seven piece neck is interesting because the ebony stringers are part of the neck contour.

Its hard to believe that neck looks "done" now, I was really expecting it to take a lot longer. I probably cut a few corners using the power tools, but I'm happy with the result, so I guess all is good. I guess the next thing to get done is the wings, I'll have to think about the process tonight.

Started the neck

I started out carving with the spoke shave, which didn't go great. No matter how light a cut I took it would dig in on the stripes in the tiger maple. I ended up using a belt sander and an orbital sander, with the spoke shave a bit too. I have it roughly shaped, getting to the final shape will take courage and trust in my measuring skills. I know that truss rod is really close to the back.
It's amazing how rounding off the back like that makes it look like a bass neck instead of a block of wood. Probably get to more tonight.

Monday, October 15, 2012

Neck - looking good (and some bike content)

I spent an hour or so working on the neck today. First I had to scrape off the glue that squeezed out, then sanded everything down until it was straight - it was very manual going back and forth between the drum sander, a scraper and a sanding block. Its looking great now - nice and straight. I need to cut a bit off the back of the neck (I left it big "just in case") and then I can get on my way with the neck carving. I saw a video on line from someone who knows what they are doing and it took them four hours. So I'm probably looking at 6 hours easily, probably more like 8.  I can't imagine removing all this material with a spoke shave, I have a feeling a belt sander and/or the band saw will come in play.


This is an optical illusion, the fretboard doesn't actually dip down like that :-D


A little bike content (I really expected that there would be a lot more bike content in this blog!) - I went and picked up a spoke shave from my brother who was at the other end of Tolland. It was a beautiful day for a ride and I cranked out 25 miles or so. That road bike is pure evil - the only thing keeping you from going faster is you. It has a computer on it that tells you whether you are going slowing or faster than your average speed - again, pure evil. It just makes you push harder and harder - ok maybe I have some control issues. Despite all the evilness, it was a nice ride on a really warm fall day. Props to the cop who made me take the detour adding 8 or so hilly miles onto my almost done ride. 

Sunday, October 14, 2012

Glue up

I glued the fretboard to the neck today. I found a spoke shave, so the fun should start this week. I probably have about 15 hours into the neck so far, it's kind of amazing that after all that work I am almost to the starting point of the other basses I have made!


Saturday, October 13, 2012

Design terrors

I am kind of stressing about the design. I still have a bunch of hours of work to go on the neck, but once that is done the next steps will have impact to the design. The first of which is the headstock.

I am really trying to find a theme of some sort to tie the whole thing together (cue the Big Lebowski reference). I have two possibilities for inlays - I have a nice piece of flamed maple and that piece of spalted maple I found in the woods. I would REALLY like to use the spalted maple. I think having something from the woods where I spend so much time would make this bass really special.

My original plan was to do something like this:
This is one of Les Claypool's basses (well its actually not his anymore because he auctioned it off for charity). My original thought was to make a pickguard like the one shown in the picture. After messing around with that idea for a while I decided I didn't like it. I also think there is a strong possibility that the wood on the pickguard would warp over time and that would just look bad.

Next idea was "circles". Instead of making a pickguard thing like in the above bass I was going to do a circle inlay, so it would look somewhat like a Musicman bass (ok, not really, but you get the idea):
I would also have a circle inlay on the top horn and the top of the headstock would have some kind of circular element. I think the circle thing is cool, but it does create some weirdness when you look at the edge of the bass compared to the edge of the circle, its a symmetrical element against a freeform one. I am concerned I would focus on that every time I looked at the bass. I know myself well enough to realize that's a distinct possibility - there's a contour on my first bass that bugs me every time I see it. 

Now I'm thinking about doing an inlay, but having it be two pieces, one on the upper side and one on the lower side. Dawn had a good idea of making the inlay follow the contour of the wing, then have a sort of free form element on the inside, closest to the pickups. To carry this idea along, there would be a teardrop shaped inlay on the upper horn and some kind of similar thing on the headstock. 

So I guess that's the idea right now. I have some time to play around with it, the key is playing around and not stressing out. Its supposed to be fun! I have to remind myself of that.